Have you noticed that new tokens are popping up like wildflowers on GalaChain’s official token swapping platform? It’s true. With more than 60 unique project tokens already created by the community since the launch of the new Project Token Creation Tool, GalaSwap is becoming a veritable treasure trove of tokens.
Which of them will have a fortuitous future, and which will fizzle into meme coin obscurity? Only time will tell, but now that these tokens live on GalaChain, there are no takesies backsies!
👆 Look how easy it is to create a GalaChain token for your project on GalaSwap! In a little over 24 hours from your submission, your token can be ready to mint and listed on GalaSwap for trading, with a small portion awarded to active Gala Founder’s Node operators for powering the ecosystem.
Who will receive your token? How will you decide what it stands for? These are yours to decide, and that’s the beauty of it. To a normie unfamiliar with the capabilities of web3, this may seem like ambiguity, but for a true innovator, this is the kind of freedom that turns dreams into reality, decent ideas into brilliant visions.
Imagine building a service that integrates with GalaSwap and uses your token as a reward for subscription, engagement or any type of interaction. Imagine offering physical and digital rewards for redeeming your token, or unlocking special access to exclusive content for holding various amounts of your token. The possibilities are quite endless, and we are extremely excited to see what the most innovative GalaChain users will do with their newly created project tokens.
Here’s a list of project tokens that have been approved already and added to the ecosystem:
TENDIES
ALPHAQ
AGBT
BEATZ
BEEF
BENE
ROI
BB
CASH
CHINA
CWC
JAUM
FUND
CRYPT
CCF
DM
TWIN
FARMER
FBB
GIBBY
GUILD
GPEPE
TORY
HUAHUA
HG
LUMN
MRVS
METAL
NDCX
PITQC
QACOIN
REPS
RFKJ
ROIBOI
RONPAUL
RUSSIA
SAFEG
SERVE
SNOOP
SOON
SVR
SQUIDLPS
STAYFREE
SUBSPACE
TVB
TACO
JESUS
THOON
TIP
TIPPED
TRUMP
TUPAC
USA
MOUM
WEN
WENGAME
WOOF
MAG
That’s all for now! When you’re ready to see your project’s token on the list, just visit THIS PAGE and start creating!
Deep in the jungles of Silvanus, an ancient ruin from a mysterious, departed race hides beneath the canopy. Perhaps this was the site of great battles or horrific sacrifices in ages gone by.
Today, the grandeur of the crumbling structures and the great device in the center of the ruins bear witness to some of the greatest destruction in The Planetary Union.
The Shrouded Shrine arena is a favorite of Spider Tanks Pilots among the Silvanites. The balanced, circular arena allows evenly-matched starting points like no other arena can, and the 180-degree path of the carnage creates unique avenues to leverage superior strategy and teamwork.
Whatever this ruin was originally designed for… it sure feels like it was designed just for Spider Tanks.
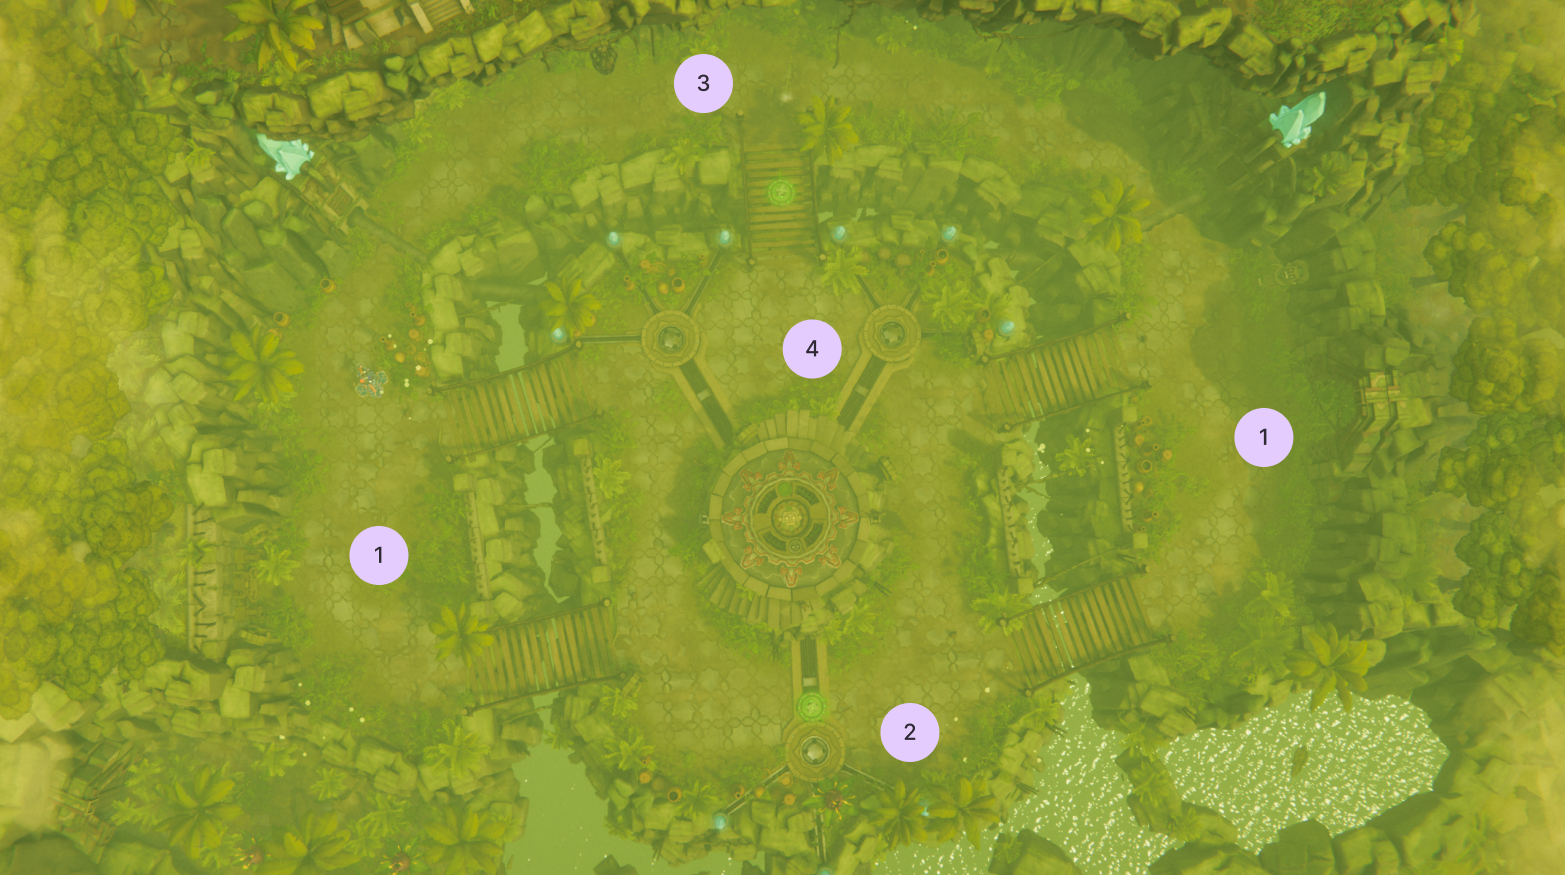
Know Your Battlefield
Shrouded Shrine has several key features that distinguish it from other Maps and require you to fine-tune your strategy to excel. There’s no large open area on this map, which may shift the advantage towards speedier Tanks. There are only two Repair Kits available here… one on a bridge in the North and one on the cliff at the South end.
Area 1: The Outskirts
Both the East and West sides over the bridges are questionable areas to dig in. These locations allow any enemies surrounding you easy access to repair kits, while you have none.
Don’t get stuck here, there are too many angles to approach you. Instead, use these lanes as a second and/or third vector of attack when the enemy is bunkered in on the North or South side.
Area 2: The Cliff’s Edge
The South side of the arena is a mixed bag. On one hand, with readily available Repair Kit and the center mechanism to hide behind, this are offers a lot of cover. On the other hand, there are four lines of approach to attack you here.
With some clever maneuvering, this could be a great place to maintain a stronghold. Attacking Area 1 through this area is particularly effective, since you can brush off early hits with the Repair Kit.
Area 3: The Runway
On the North side of the arena, you’ll find a large strip of straightaway with only one bridge to access it. Controlling this area is often the easiest, if you can maintain the bridgehead enough to keep enemies from using the Repair Kit to their advantage.
You’ll be open to fire across the chasm, but there’s plenty of room to shelter outside of most Weapons’ range. Controlling this area is a particularly effective way to have clean access throughout the entire map.
Area 4: The Killbox
Area 4 is where it all happens. Here, you’ll find the Control Point during King of the Hill.
Literally any other area on the map can threaten this position from some angle. That having been said, you can threaten everyone else from here as well. If a team can properly control this area, the other team will have no choice but to hide out trapped on this cliff or the south side of one of the outskirts.
Shrouded Shrine Best Practices
Keep Moving
Staying mobile is absolutely key. The arena is a circle, so you if you stay perceptive of enemy and ally positioning, you can bob and weave through the level without ever needing to turn around or run a straight line for too long.
The outskirts and the runway are large enough to weave back and forth… and you’ll need to. There’s no fence protecting you, so keep zigging and zagging as you serpentine through the level to get the advantage on your enemies.
Stay in Contact
Always know your allies’ position on this map. On Shrouded Shrine, it’s easy to get cut off as enemies move around the circle.
If you let the enemy get between you and your team, they could easily just herd you down into the Southeast or Southwest corner and separate you. Then you explode.
Solid example of how quickly Shrouded Shrine can turn on you 👆
No Cover Is Reliable
The bridges have no fences on them. The chasm has no fences. What cover there is on the South side is even made vulnerable by the gaps in cover around the SE and SW bridges.
The mechanism in the middle isn’t even particularly reliable cover, as any enemy could bring you into their sites by just running around the opposite side a bit, only to duck back into cover right away.
Bridges Are NOT Safe
The bridges on the East and West sides can be hit from the bridge opposite them to the North and South. This makes them ways to get from point A to point B rather than reliable bridgeheads to hold.
The North bridge is less exposed, but still very dangerous. It can be hit from a wide range and is arguably the most exposed spot in the map, but very powerful if you can hold it.
Rumble in the Jungle
Shrouded Shrine can be hard for beginners to wrap their heads around, since you can get everywhere from everywhere basically. This can be an advantage though… once you learn to use it.
That’ll be all for us this week, but we’ll be back next week to knock up our bolts and zoom in on the Crossbow Weapon!
Let us know your favorite ways to destroy Tanks with the Crossbow for a chance to be featured in the next edition!