Hello all you pilots out there, and welcome back to the Spider Tanks Showcase!
In this edition, we’re diving into a newer tank body in the arena, but one that offers some things no other body can. This mighty body forgoes the legs of most of its competition for a smooth ride over a more traditional tank drive system.
That’s right. This week, we’re talking about Tracks. Tracks is a retro special, sporting an antique track design that was popular on the Canadian subcontinent in the 15th century of Earth’s ancient past. This tank proves why such time-tested designs were popular, as it’s highly efficient and capable of amazing bursts of power when piloted by a skilled technician.
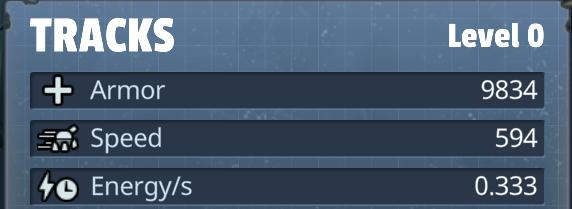
Tracks is big. Not Titan big, but pretty dang big. Usually, Energy is strictly a function of size – not in the case of Tracks. Tracks has the single highest Energy gain of any tank body out there, meaning you can use more abilities more often.
Like the Nomad, Santa’s Sleigh or Snoop’s Bumpin Lowrider, Tracks is a directional drive body. This means that it can move on impulse forward and backward but not side to side. You’ll have to adapt to this driving style if you’re not used to it, but the key is to stay in motion at all times if possible. It’ll take a while to accelerate from a stop, and you can’t turn while not moving. Keep agile and keep turning so that you can react quickly.
The Charger: Tracks/Carver
Remember how we said you get more energy than anyone else using Tracks? This combo takes full advantage of that. A Carver requires you to be up close… not a usual choice for a massive tank. With Tracks’ burst ability thanks to its energy though, you can cover a surprising amount of ground fast to chop down the competition.
Speed Boosters cost very little Energy, and with a high level Tracks you can theoretically use them pretty much whenever you need if you’re conservative with your Energy when you don’t need. Throw in a Repair Drone for another low-cost ability to keep you running smooth and you can use more abilities during the match than anyone else.
Opponents will think they’ve got your speed and reach down, then you kick on the afterburners. Make sure that you’re well repaired when you attack and choose your window well. Once you go sprinting after an enemy you’ll be a sitting duck if you turn around, so make sure they end as pieces and not you.
Mobile Triage: Tracks/Repair Artillery
While Tracks’ consistent Energy and toughness are huge assets, for many pilots the drive style of Tracks will often be a disadvantage. We can minimize that liability though by staying on the periphery of the fight when possible, and artillery makes that more possible.
With this, you’ll be playing support most often. You’ll still have the massive Energy gain to scramble and reposition if you need, but you can stay moving on the outside of the conflict, ensuring that your team stays healed and supported.
With Tracks large amount of Energy, Repair Zone could come into play as well here. Usually this ability is only useful in very few situations due to its high cost, but with Tracks you could lay down a repair zone every 20 seconds or so, allowing you to heal both team members at once.
The Burster: Tracks/Bouncer
This combo accepts that Tracks won’t be the fastest around, but it’s a much more traditional way to make a hard-hitting tank that has the chance to put out big bursts of damage when needed.
Bouncer can absolutely tear up an opposing team if you get them at the right time, and Tracks’ ability to utilize excessive amounts of Speed Boosters plays a key role here. With Tracks you can afford to be on full Energy most of the match, which means you can always be ready to make a sprint.
With this combo, you’ll want to get in and unleash your bouncies – then get out and bide your time until your next attack. Don’t boost as soon as you start your approach and give away your position. You want to save that booster until the last possible moment so that you can still use some of it to escape and prepare for your next pass. This opens up your allies to come in and clean up the mess or set you up for another run.
On Track to Victory
Tracks may be a blast from the past, but it has a lot of modern relevance in today’s arena. Don’t be turned off by the directional drive system without hopping in the pilot seat and giving this one a try… it can make big plays happen once you get used to its tendencies!
That’s all for us this week, but we’ll return next week for another Spider Tanks Showcase!
Have a body, weapon, abilities, map or game mode you’d like us to cover that we haven’t gotten to yet? Let us know on Discord and we’ll buckle up and get it ready!
It’s that time again… the Spider Tanks Showcase has returned. This time we’re locked and loaded and are ready to unleash the proper fury of the Railgun!
Welcome back Pilots! This week we’re breaking down one of the most deadly weapons ever conceived by humanity. These mighty projectiles can bring a Tank down in one hit if fully charged and their destructive power is unmatched throughout the Earthen Cluster.
That’s right, today is all about the Railgun! The Railgun is a powerful long-range weapon powered by fusion-generated electromagnets. The immense momentum of these large projectiles can pierce the armor of any Tank, even dealing fatal blows to mint condition middleweights when fully charged.
The longer the Railgun is charged, the more damage it does. Unfortunately, you’ll be slowed down to a crawl while charging your electromagnets for firing… it takes a lot of energy to launch this heavy duty ordinance! A good Railgun Pilot has to know how long to charge, how to stay safe while charging, and above all else, how to make sure their superpowered hits land on enemy tanks.
Unleash the Power
When using a Railgun in the arena, positioning is more important than with most weapons. You need to make sure that you’re not going to be under threat while firing, but also that you have a clear shot on your opponents.
A clear shot isn’t just about range… often it’s just as much about angle. How you approach the enemy matters. If your vantage point effectively only has a small window to attack, your slow shots may not land a blow before the enemy escapes.
The slow travel of your projectiles is absolutely key to understand if you’re going to play Railgun. Many inexperienced Pilots will try to lead their quarries as they would with a Cannon or Crossbow. These projectiles move at nearly double the speed of a Railgun though… you’ll need to lead your target further or get closer.
Experiment with different charge levels on your shots. If you take 95% of your opponent’s health in one shot, that still means you’ll have to hit them with another shot to finish them off – no different than 50/50 on two shots. Sometimes this means you need to wind all the way up and try to finish them in one. Often it means that you’re going to have to go in close for a little double tap to finish them off. Plan ahead for these moments. Your goal isn’t to injure tanks… it’s to destroy them!
Plan ahead for that double tap and not even big tanks will be able to defend against you.
Run From the Rail!
It may seem easy to dodge Railgun shots since they move so slowly, but up against a good operator the Railgun can be very difficult to evade.
The Railgun is an extremely wide projectile. Its impact radius is much bigger than other weapons. While you can just barely juke to the side with a Cannon or Triple Threat, you’ll need to fully get out of the way or that rail will smash you.
While a Railgun is charging, you can see how much charge it has above the enemy tank. Wait until they fire before approaching them… it will take a moment for them to charge up another shot. Be wary of a railgun that’s fully charged and waiting. A patient Railgun is a deadly Railgun.
Try to hit them from range when possible and come in close only when they’ve just fired a shot. Avoid moving directly towards a charged rail… if you have no angular momentum you’re only making it easier for them to lead you. Zigzagging and spin moves are encouraged here. You want them to waste that shot.
Don’t walk right into the Railgun’s line of fire. You may as well just hand them a giftwrapped kill.
If you are heavily damaged by a Railgun, disengage immediately and go heal if possible. It may take them a while to charge up their shot, but they don’t need to fully charge if you’re already damaged. A clever Railgun Pilot will find a way to get in close for that quick kill or have the second shot on the way by the time you get hit with the first. If you’re low on health, they can hit you with their lowest charge level and still bring you down.
Last, if you’re playing in a heavy tank, don’t be afraid to get hit by a rail. If your tank is bigger than a Jet/Hurricane, chances are that a Railgun will have to hit you twice to bring you down. It takes a while to hit you twice. Use that to your advantage.
Railgun Tactics
A Railgun isn’t just a massively destructive Weapon – it’s also a powerful deterrent. A fully charged Railgun tucked around a corner is something even the bravest of Pilots won’t readily walk straight into. You may only fire ~15-20 shots in a regular match while playing a Railgun, but all those times that you’re charged and waiting to fire are also affecting your enemies and helping your team.
Use your Railgun to cement your team’s zone of control. Even if you don’t hit anyone, firing a Rail through the choke point on a map or a command point sends a clear message to your opponents about what is waiting for them.
On a fast body your Railgun’s zone of control can massively expand – once you master the sprint, shot, sprint, shot timing.
Railgun is a long-ranged powerhouse, but that doesn’t mean that it’s not useful up close too. When you’re point blank on the enemy, you remove the difficulty of hitting tanks with the slow-moving projectiles. You basically turn your tactical long-range warhead into a superpowered grenade. If you can penetrate back into enemy territory, you can absolutely wipe them out with just a few shots. Sometimes kamikazee tank is a good play.
BOOOOOOOM
A Railgun is terrifying when it 1-shots members of your team around you left and right. This is part of its power. While it may take some learning to be super effective with this weapon, you’ll be terrifying from the start! A weapon capable of bringing down a whole team in three shots makes your opponents question their strategy, giving you a chance to scoop up a win!
It may take some practice to get really great with a Railgun… but it’s worth it if you want to strike fear (and explosions) into your opponents!
That’s all from us today, but we’ll be back next week with yet another Spider Tanks Showcase!
When the people of Rewban the Aggressor first colonized the planet of Cacus, they were prepared to forge a new life from the inhospitable terrain of the molten world. As they began excavations, however, it became clear that they weren’t the first to have this idea.
Large ruins were discovered all over the planet, and the new Cusans were more than happy to utilize this treasure trove. Little is known about the lost race that previously inhabited these vast caverns, but the Cusans of today are more than happy to pluck the precious gems from these deep places to trade with the rest of The Planetary Union.
Of course, the Tank Olympiad has found a home in these caverns as well. The heat of Cacus is the perfect venue for Spider Tanks mayhem!
Know Your Battlefield
Dragon Cave is incredibly symmetrical compared to most arenas. While this offers a definite advantage to keeping up your strategy while you’re on the move, it also presents issues for team coordination. A split decision between two Tank Pilots could lead to easy pincer attacks from your enemies.
There are four repair kits at regular intervals around the perimeter of the central ring of Dragon Cave. There are four distinct types of area, each repeated four times in a circle.
Area 1: Satellites
These four circles on the very exterior of Dragon Cave are useful as a sort of redoubt when in trouble or regrouping, but they can also be a cruel trap.
Each of these has three angles of attack clearly pointed at them. Attackers will come at you around the corners or shoot with a longer range weapon across the pit. If you’re playing a shorter range weapon, don’t use these!
These areas are, however, absolutely critical in Chicken Chaser. Make it a point to check the far edges of these circles regularly, as birds will commonly be stranded over here and overlooked by other players!
Area 2: Roundabout Pullovers
These four circles are in between and just inside of area 1’s circles. These are even more congested and wide open than area 1, but they are absolutely critical to maneuvering through the arena.
User these but avoid lingering in the middle of them. When standing in the center of these circles, you can potentially be hit from four different angles. Approaching the edges of these circles necessarily obscures attack from multiple angles due to the pillars on the four corners of these circles.
Consider these transitional places when possible. Stage attacks from here and pull chasing enemies through them, leaving them guessing which exit you’ll take.
Area 3: The Chasm Gap
The small strips between each lava chasm are absolutely critical for dominance of the arena. Each of these is protected by a narrow fence on either side of the chasm, providing a decent amount of cover despite being in the middle of all the action.
Depending on the match, these can either become hotly contested or major defensive bulwarks… and which could shift quickly according to the flow of battle.
Since these areas almost always play a role in how the match plays out, it’s fitting that the Command Point in King of the Hill will spawn on the north most of these areas.
Area 4: The Inner Circle
The inner circle is in theory the most exposed area in the map, but it enjoys incredible cover from the ancient dragon statue towering overhead.
Hugging these walls can leave you covered against half the map, and you can quickly race around the small circle to reposition yourself better than another tank can from any other part of the arena.
Poultry Pusher often becomes the most violent as the payload processes on either side of this area. Even in other game modes though, this will be one of the best angles of attack. With only a few seconds of movement from anywhere in this ring, you can get in position to threaten anywhere in the map.
Dragon Cave Best Practices
Cover Isn’t Always Reliable
Those big, sturdy pillars on the outside corner of the south and west area 2s may seem nice and cozy… but they can be easily shot around from the adjacent area 1s with tiny adjustments to positioning.
Even on the interior, the cover you find in the shadow of the dragon can be easily compromised if an enemy moves perpendicularly away from you instead of straight towards you. A clever bunch of opponents can make those angles close in on you when most of your cover is part of a greater circle.
Enemies Approach Quickly
Thanks to the many ways to wind across the relatively small battlefield, you can get anywhere in Dragon Cave relatively quickly, even with a pretty slow tank.
Get trapped on the satellites and you may have a bad time.
This means that enemies can come from out of view to on top of you fast, and that 8-second respawn timer may be all the delay you get before an enemy is back in the fight.
Mind the Enemy’s Weapons
The weapons that you are up against make a huge difference in any match, but even more so in Dragon Cave.
Here, you’re working with very narrow cover anywhere but the very center of the map. Artillery will follow you anywhere here, and melee weapons will have very little ground to cover before they’re tearing you to pieces.
Glorious Battle
Dragon Cave’s layout is fairly simple, but underneath that lies an incredibly complex nuance to positioning if you really want to excel in this arena.
That’s all we’ve got for this week, next week though we’re powering up for some almighty BOOMs as we dive into everything about the Railgun!
Today, we’re breaking down an ancient terror from our ancestral past – The T-Rex!
This terrifying, fire-breathing beast was first uncovered by Earthiologists decades ago. Research has since revealed much more about this ancient terror.
The T-Rex was an unstoppable menace to early humans, and its ferocity can be seen in the arena. The limited archaeological context that’s been gleaned from the ancient discs indicates that T-Rex were originally bred as pets for human entertainment before breaking loose and nearly destroying the species.
At the height of their saurian civilization, it’s thought that the biggest among them must’ve dined on as many as 400 or more humans a day to maintain their size and energy and ruled over half the planet. The rex was not as massive as the chicken, the long-reigning alpha predator of Earth. It did, however, still tower over all of human creation other than the largest of golf stadiumariums.
In the arena, Rex boasts the most powerful offensive weapon seen by these monstrous human creations throughout the distant history – anti-matter breath.
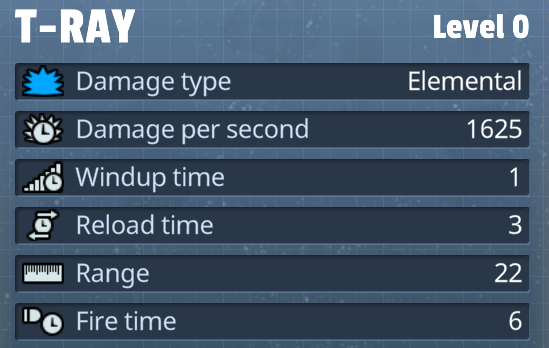
The King: Rex/T-Ray
The T-Rex Hero Tank is made up of the Rex Body, the T-Ray Weapon and the Prehistoric Skin.
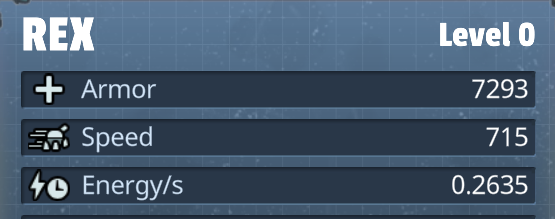
The Rex Body is quick and agile, representing the killer instincts of a true predator. Fabricated to scale, it actually runs quite light for its overall size. This Body won’t give you much in the way of Energy gain or durability, but it’ll zoom in for the kill when needed.
The T-Ray Weapon is entirely unique in the arena, as matter cannot stop its projection forward. It emanates from the Weapon in a very narrow cone. When you fire, your movement and turning motion will be slowed down until your ray powers down. This leaves you entirely vulnerable while your Weapon is firing, but anyone in range is also entirely vulnerable to your Weapon.
A Rex is excellent at sweeping up wounded Tanks after a fight.
The T-Rex struggles without a party to back it up, but with the right tactics it can absolutely destroy any opposing team.
Nowhere to Hide
The only way for enemies to avoid your T-Ray’s beam is by moving too quickly for it to hit them, or just running away. No amount of walls or barriers will save them.
Walls and barriers are, however, still how they dodge the rest of your team. Often enemies will find themselves unable to concentrate on avoiding you and your allies at the same time, since how you attack is so wildly different.
If you find good cover and get protection from your allies, the enemy can be entirely stopped by the perimeter your ray creates. This is especially potent on location-based matches, like King of the Hill, Poultry Pusher… or really any Map with a bridge or choke point.
With the right positioning, they won’t be able to avoid your beam.
Your Rex is squishy, but it’s also super zoomy. Your T-Ray takes a split second to power down when you stop firing. With a little timing, you can learn to predict that delay and easily Speed Booster up and flee when you’re in danger. Put a wall between you and your enemy again using your speed, then crank up the antimatter!
Mix It Up
The Body and Weapon of T-Rex are awesome to use for different combos. The Rex body represents a solid light body with equal stats to the Chicken Body. Not quite as squishy as something like a Flea, but still with significant moving power when it needs it.
The T-Ray can be great across a number of different Bodies because of how totally unique of a Weapon it is. Those who find their Rex a little too squishy may do better with a medium sized, high energy Body like Jet or Hurricane. The extra Energy will leave you more room to apply your strategy flexibly, and the extra bulk will help you not explode.
Big Rex kind of creates cover where there is none.
A very heavy Body with a T-Ray provides a different experience altogether. With this style, you’ll function more like a stationary heavy turret on your team.
Rather than having to hide away behind a wall like you do with Rex, using a heavy Body you could choose to be the wall yourself. How many good shots are they really going to get off on you when you’re spraying antimatter at them?
If you choose to play T-Rex with a heavy Body, make sure that you have a plan in place for melee Weapons. T-Ray doesn’t really have a defense against a Carver or a Flamethrower. Think about packing a grenade, Relay Drone or Reactive Plating.
Happy Hunting
That’ll do it for us at The Spider Tanks Showcase this week. Have fun out there with those T-Rays, and remember to exercise antimatter safety at all times in the arena.
We’ll be back soon with another Spider Tanks Showcase… Next time we’re heading deep into the caves of Cacus to spotlight Dragon Cave. Have tactics you rely on in Dragon Cave? Let us know on Discord for a chance to be featured in next week’s showcase!
Welcome back Pilots! We’re here with another Spider Tanks Showcase. This time, we’re getting sneaky. Stealth abilities are on display!
Too often stealth is an overlooked strategy in the arena. Let’s face it, the arena is a brute force kind of place… but
Stealth Abilities and Strategy Overview
As we discussed in our Movement Abilities showcase, positioning is one of the most important things in any Spider Tanks match. In that regard, stealth Abilities serve much the same purpose – Get better positioning without the opponent ruining your day.
Stealth Abilities, however, can serve a little more niche function than movement Abilities. At the end of the day, movement will just take you closer or further from your target. Stealth Abilities, however, throw in much more confusion. Stealth Abilities not only get you better positioning, but disrupt the opposing team’s coordination and their positioning.
Stealth is a little more nuanced than movement Abilities though. When you’re using a Relay Drone, you don’t really care what your opponents think or perceive… either way, you’re going to teleport. When you’re using stealth, however, you need to take into account what your actions look like from your opponents’ perspective. Deceit is part of the strategy, and if you pull it off it’ll have devastating effects on the opposing team.
A nice, slow moving body makes it incredibly hard to see your outline while cloaked. These two poor Tanks never saw it coming…
Silent Killer
Offensively, stealth Abilities can easily strike fear into opponents. The arena is already chaos, add in not knowing which direction death is coming from and it can be impossible for your opponents to feel safe.
Crucially, that’s part of the plan. In the early moments of a match, your enemies may not know that you’re packing Cloak Drone or a Smoke Canister. Once you’ve lost the element of surprise though, you still have the element of fear on your side. Your opponents will have to be wary of your stealth Abilities all the way through the match. Forcing them to think three dimensionally like this could force them to make a mistake at a critical moment.
This Shotgun gets to walk right up on these two wounded stragglers. It may not have fooled them for long, but I guess we’ll never know.
To capitalize both on surprise and fear, your first strike with deception needs to really count. Not only should you secure a kill or a serious positioning hiccup for the opposing team, you should make your target lose their confidence. If they spend one minute sweating being humiliated in front of their team, you may have already won. Get them out of their comfort zone and it’ll pay off for the rest of the match.
Fade Away
Stealth Abilities are a quick and effective offense if you know how to use them, but they can also be beneficial defensively. If you’re on the run a quick Decoy Drone may not fool the enemy for long, but it can easily make them lose a split second to decide which is which. If an enemy has you in their sights, a smoke canister is just as effective at helping you dodge bullets as it is at hiding you while shooting them.
This Carver doesn’t buy much time with their decoy, but it’s more than enough wasted flamer fuel for the Flea that it has no chance against the larger Tracks.
Even Disguise Drone or Cloak Drone can give you some time to get to safety. If you’re going through a large pack of enemies and you pop a Disguise Drone, you’ll be difficult to follow even for someone that was watching you disguise. A quick cloak when you have a minute where you know you won’t be shot may let you disappear in plain sight. True, they can still see a vague silhouette of your outline… but that’s much harder to follow than a big, showy, multiple ton hunk of metal!
It’s all about positioning and timing, and stealth Abilities let you use distraction and deception to get that few extra seconds here and there to unleash havoc. Defensively or offensively, they can be deadly in the hands of a master.
To dodge bullets, you need to be able to see where they’re coming from just as much as you need to see your quarry to shoot it. Your brain is capable of calculating those ballistics, but only with a point of origin… if the shot is coming from some ambiguous place inside the smoke, however, dancing around it is a lot harder.
Sneak and Destroy!
That’ll be all for today’s showcase, but there’s tons more to cover in the Spider Tanks arena!
Next time, we’ll be back with a Hero Tank showcase – The T-Rex! Have mad skills with this ancient predator? Let us know on Discord or social media for a chance to be featured in the next Spider Tanks Showcase!
Welcome back to the Spider Tank Showcase! This week we’ll be taking a pretty sharp turn away from the pew pew of Crosssbow from last edition. This week we’re blasting through one of the bigger hunks of metal in the arena – The Maul!
Maul is a heavy Body, though it’s lighter than the biggest boys out there like Titan, Plate or Tracks. This large bulk provides you with an incredibly healthy amount of durability and Energy, but doesn’t slow your movement to a crawl like the biggest Bodies out there do.
The Warrior
Alright, we wanted to start off with originality… but we just can’t pass up the chance to revisit The Warrior build. Maul was, after all, originally released with the Bouncer. It’s a very classic combo.
The Maul’s bulk allows you to line up your shots a little better to get the best bouncy goodness. Since each ricochet with a Bouncer deals more damage than the last, shots that chain are the paydirt on this one.
Bouncy, bouncy, bouncy.
Maul gives you the maneuverability to make sure you can exploit weaknesses you spot while holding a Bouncer. It’s bulk lets you focus solely on getting your shot off, as you can easily shrug off a hit or two.
The Sentinel
This one is similar in theory to The Warrior, but utilizes the Sniper Rifle to get the most out of Maul’s toughness. Sniper Rifle is deadly from a distance, but lining up the right shot can occasionally leave you exposed.
With a Sniper Rifle, a heavy Body like Maul can easily occupy a choke point in the battle. Control access to part of the map, and you open up your allies to do all sorts of fun shenanigans. The point isn’t so much to not get hit… more to make them pay for wanting to hit you.
Long-range support doesn’t mean out of the action.
In the above clip, the Sniper Rifle has occupied a crucial junction just in front of the teleport. From here, its teammates are able to exercise control over the repair kit above and freely move around the map and only leave one quad where the enemy is safe.
The range on a Sniper Rifle is long enough, that no one can threaten the Maul for long. Even if they can, they have to be in the open to do so… and it only takes two or three clean shots to bring them down.
The Berserker
This last combo isn’t for every Pilot. For The Berserker build, we’ll use Maul alongside Carver. The bulk of Maul allows for you to shrug off the first few hits before your blade finds home, and the high Energy lets you play flexibly with Abilities like Relay Drone and Speed Boost.
You’re going to blow up a few times on this build… more than a few, in fact, while you learn to use it. Patience is the key. When you see your opening, zig and zag as you’re able to. Remember though, the zig towards your enemy. If you get hit a few times, that’s ok. Just kill them before they kill you.
Slice and dice time!
Maul is just heavy enough to ignore full frontal damage for a second or two. That’s often what you need to pin in the enemy with your sword. Keep them running from you. You want to be patient and wait for the right opening, but if you play scared you will lose. You’re a gigantic tank with a sword on top of it… they should be scared of you!
That’s Maul, Folks!
That’ll do it for our 25th edition of The Spider Tanks Showcase! Did we miss your favorite build with Maul? Did we choose one that you think is amateur hour? Let us know on Discord!
Next week we’re giving the Tank combos a rest for a bit, as we’ll dive into Stealth Abilities in the arena. Are you super sneaky? Have some good clips of your deceptive dominance? Let us know on Discord or social media for a shot to be featured in the next Spider Tank Showcase!